Tutorial: Making Fabric Facemasks (non-medical)
 |
| Fabric Facemasks |
Like many others out there, I decided to have a go at making some non-medical facemasks.
As the coronavirus pandemic continues to affect our lives, communities and countries, it is necessary to do everything within our abilities to help protect ourselves and the people around us. There are clearly arguments both for and against recommending the public use facemasks, but I feel that if it has the potential to help, in the current situation, it seems like a positive thing to do.
The concerns with regards to the public using facemasks are as follows:
- Medical professionals have their masks properly fitted and the average person probably wouldn't be able to tell if the mask they are wearing is the appropriate one. This means that they would not get the full benefit of the mask that a medical professional would.
- There are also concerns about people actually infecting themselves when removing a mask, if they are not careful enough and therefore defeating the whole point of wearing it in the first place.
- As there are already shortages of the PPE (personal protective equipment) that is so desperately needed by those amazing individuals who work in the NHS and hospitals around the world.
- People would feel 'safer' wearing a mask and therefore not follow the social distancing measures.
For more information, please read:
- By all means, wear a face mask. Just don't think it will make you invincible
- Can a face mask protect me from coronavirus? Covid-19 myths busted
- Do face masks work against the coronavirus and should you wear one?
I am therefore keen to promote the idea that the fabric masks that I have been making should be considered to be cough-guards. While they will provide some limited protection for the wearer, these masks are probably better at protecting others from the germs of the person wearing the mask.
As individuals can be asymptomatic, and not realise that they have the virus, these masks are mostly there to protect others from the coughs and sneezes of the person wearing it. Therefore, inhibiting the spread in that way. So, if you do choose to make and wear a fabric mask, please keep following the lockdown measures, stay at home and protect yourself and the people around you.
Research:
I did a bit of research (i.e. watched a few youtube tutorials) before choosing to make the masks. There are currently a lot of tutorials and a variety of different mask designs for you to try. Here are some of the sources that I considered and found useful:
YouTube:
- Bernadette Banner: https://www.youtube.com/watch?v=Pmd4D5Ogepk
- Sewstine: https://www.youtube.com/watch?v=DZBbkn-g-vE
- Angela Clayton: https://www.youtube.com/watch?v=H_-YJ-Bsi6o
- Thoughtful Creativity - CRAFT, SEW, DIY: https://www.youtube.com/watch?v=FW1TCQDN4do
Filtration-Efficiency of different fabrics for masks.
University of Florida mask page (includes two patterns) https://anest.ufl.edu/clinical-divisions/mask-alternative/#prototype2
Discussion and testing:
I wasn't sure which mask design to attempt to make when undertaking this project. I wanted a relatively simple mask that I could make for friends and family members to wear when they go out to the shops to get some things from the supermarket. So, I wanted to make sure that it was a design that they felt comfortable wearing, that wasn't claustrophobic and didn't look too odd.
I did consider making one of the 'pocket' style facemasks, into which you insert a coffee filter. I decided against this, due to a lack of coffee filters, but that does sound like a really good idea.
After watching the video by Sewstine, I used some scrap fabric to make up the designs that she recommended, based upon the patterns from the University of Florida. The mask that (when made using the correct specifications) could potentially be used in a hospital setting was the first design I attempted. It was relatively easy to put together, however when worn, it did look incredibly silly and the feedback from my testers (aka my family) was that it was quite claustrophobic. Despite the high credentials that this design possessed, it was clearly a no. I will therefore have to leave that style for medical professionals.
I then attempted the second mask design by the University of Florida; it is similar to the mask created in both the Angela Clayton and the Bernadette Banner tutorials. This design had more positive feedback, although it was a little narrow going across the face.
I then looked at the designs used by Angela and Bernadette. Angela's mask is shaped over the nose and is a little more complicated to make. Bernadette's design is probably the most basic, however, the prototype of this mask didn't fit very well over the nose. This meant that the wearers breath would steam up their glasses, and wouldn't be as effective at preventing the spread of germs.
Finally, I considered the way that the mask is held to the face. Long ribbons/ties were one option, the other was to use elastic that looped around the ears. The Thoughtful Creativity tutorial demonstrates a mask that is worn using elastic.
As a result, I decided to create a hybrid mask. I wanted to have something that was:
- easy to make,
- a good fit around the nose and face,
- was as effective at filtering as possible (with the materials I currently have in the house)
- Easy to put on and remove (so you can take it off without touching the front and the germs on the outside)
I also want to note that I am only making masks for friends and family. My sewing skills are okay, but I really don't feel confident enough to make them for anyone else. My family will forgive me if they aren't totally professional-looking. To be honest, I am much more of a crochet/knitting enthusiast than a seamstress!
1.
Cut Four (6 x 9 inch/15.5 x 23 cm) rectangles of tightly woven cotton
 |
| Cut out four pieces of 6 x 9 inch tightly woven cotton for each mask. |
I began using Bernadette's mask pattern as it was the most basic of the designs considered.
Prepare your fabric by prewashing, drying and ironing it. That way, it wont shrink when you put your finished mask in the wash.
I therefore started by cutting out 6 x 9 inch (15.5 x 23 cm) rectangles from some tightly woven cotton. This is one of the fabrics recommended for the creation of facemasks (see the study linked above, or watch Bernadette Banner's video for an explanation). I decided to go with the four layer mask, as this seemed to be a relatively sensible - more layers, greater filtration.
2.
Adding a wire to help give the mask shape over the nose.
 |
| Galvanised wire is used to hold the mask over the nose, for a better fit. |
Having tried out a few different designs, I found that having a wire inserted in the mask helped to make the mask a better, tighter fit around the nose. Not only does this help to protect the wearer and stop them spreading germs. It also means that the mask is held closer to the face, preventing your breath from steaming up your glasses on cold days. It also holds the fabric down from your eyes. Having the fabric slip up to your eyes it is very annoying.
For this, I looked at the designs published by the University of Florida and the Sewstine youtube tutorial.
I used some thin galvanised wire that I had in my craft box and a pair of plyers.
I cut a ~10.5 cm (approximately 4.2 inches) wire, bending the ends under so that it was less lightly to poke through the fabric.
The wire length is now 10 cm (approximately 4 inches) long. The wire is a little bent below, but you can see that it is about 10 cm long.
 |
| Galvanised wire with ends bent under (approximately 10 cm) |
Inserting the wire
Take the two rectangles of fabric that you have chosen for the back two layers of your mask.
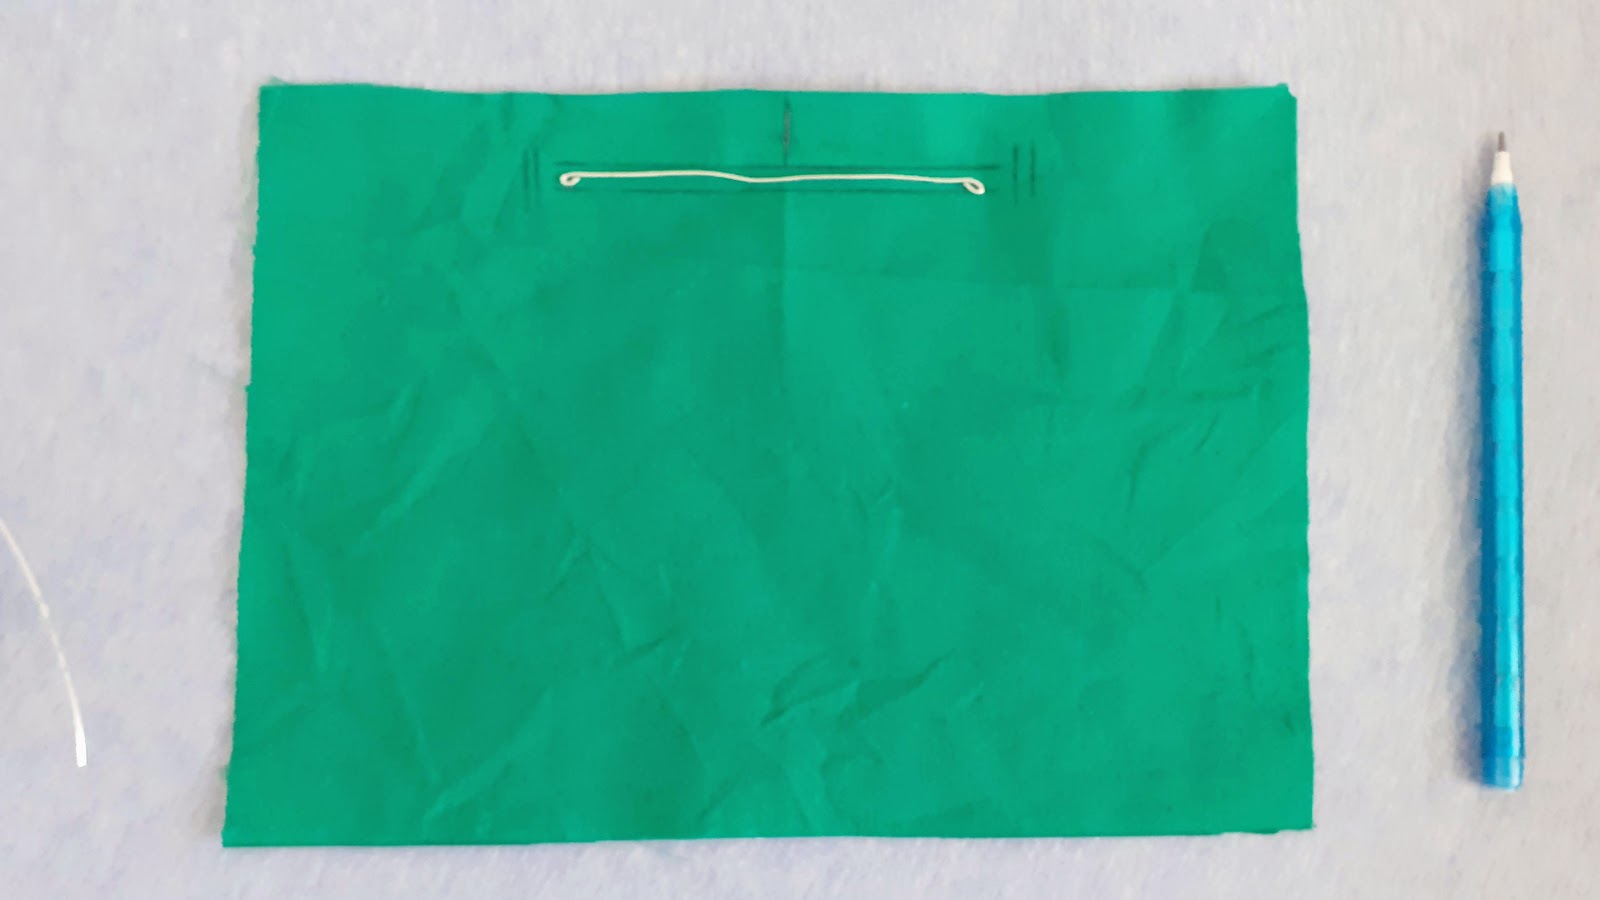
On one piece, mark the centre of the longest edge (this will be the top edge of the mask):
Measure down 1.5 cm from the top edge at this centre point:On one piece, mark the centre of the longest edge (this will be the top edge of the mask):
 |
| Markings for the stitch lines to insert the wire - see below. |
 |
| Top edge, centre, measure 1.5 cm down |
1.5 cm from the with the top edge of the fabric (parallel with the top) draw two 10 cm long lines, one above the other.
 |
| 10 cm lines. 5 cm either side of the centre. |
The distance between these two lines is dependent upon the thickness of the wire that you are using. The gap that I left was about 3-4 mm; just enough room for the wire to fit without it moving about.
 |
| Checking that the wire fits between the two stitch lines. |
Sewing the stitch lines:
Stitch each of the two 10 cm lines marked.
Stich the two rows marked on one of the ends of the channel that you have just created. This will stop the wire from poking out.
Now you can slip the wire into the channel
 |
Please excuse the very scrappy stitching on this example! I should have chosen a better -neater- example.
I was mass producing these at this point and my neatness levels were decreasing!
Also, I just lifted the foot of my sewing machine at the end of the channel, turned the fabric and sewed down the other line.
And, yes - I do realise that I haven't stitched the end-stop lines yet - this was just to show how the wire is inserted between the two layers.
|
Once you have inserted the wire, stich the end-stop lines on the other side to secure it in place. I went back and forward over these lines a few times, just to make sure.
You now have one double-layer, wire sandwich and two single layer rectangles of fabric. As you can see, I chose to have a patterned layer for the outside front of this facemask:
 |
The inside double-layer with wire and the two layers that will make up the front of the mask.
They look rather out of shape in this photo - I think it must have been the camera angle or something - they really are rectangles!
|
3.
Attaching the four layers together.
 |
| Fabric layers - corners of double layer and printed outer layer folded up so you can see the order. |
The next stage involves attaching the double-layer back to the front two layers.
Now, you need to decide which side of the back double-layer you wish to have facing you and which you wish to have as an inner layer.
Place your pieces of fabric down in this order.
Firstly, the mid-front layer. This will be inside the facemask and wont be seen - I have used a green piece of fabric - seen the as the bottom layer in the above photograph.
Next, place the piece of fabric that will be seen as the outer front layer. This the white starry fabric in the photograph. Make sure that the front of the fabric is facing upwards - with the design facing you. The corner of this layer in the photo is folded over so you can see the order. Just make sure that the right side/printed side is facing you.
Next place the back double-layer with the wire. Position it so that the side of the fabric that you want to have touching your face is positioned facing down (on top of the printed fabric). As this will be turned inside out the top layer will eventually become an internal layer in the mask.
Once all the layers are stacked, pin them together.
 |
| Pin layers and stich across the top and bottom edged. |
Now stitch along the top and bottom of the mask. I used the edge of my sewing machines' presser foot to create a narrow seam allowance.
 |
My stitching isn't great, but it doesn't help that the bottom seam allowance isn't laying flat!
I think my poor stitching just shows that you don't have to be a perfect seamstress to make one of these!
Please be kind - I had made a lot of masks before I decided to photograph the process and my precision was definitely waning by this point!
|
4.
Turning the facemasks the right side out

So far your facemask will look like one of the ones in the above photo. The next step involves turning it inside-out, which will actually make it right-side out because the outside is currently on the inside (… if that makes sense!).
Put your hand between the centre two layers and fold the fabric through. Don't worry if the wire bends a bit as you do this, it is supposed to be flexible so that it fits over the shape of your nose.
 |
| Turn the facemasks the right way out, so that the printed fabric on the outside. |
The raw edges of the seams are now on the inside and the printed fabric is on the outside.
Okay, so this is the part where you need to get the iron out. Press the facemask flat, with the seams folded inside the flattened layers of fabric. You may also need to straighten out the wire a bit - but don't worry too much.
 |
| These three have been ironed (two with a pattered front, one plain green) |
5.
Fold in the pleats

Now fold in and pin the pleats. I folded in my first pleat at 4 cm, then the next pleat 6 cm from the top. Remember that the top edge has the wire inserted along it. The mask is now 7 cm with the pleats folded in place.
Iron the pleats in place and stitch across both edges to secure them in place.
 |
| Stitch pleats in place. |
6.
Adding elastic
 |
| Elastic looped and pined to the edge of the mask (I attached it to the front). |
I initially cut 6 inch pieces of elastic as this is suggested in the Thoughtfully Creative youtube tutorial. Finding the appropriate length for the elastic required some trial and error. I didn't end up needing to have quite such a long piece of elastic. I just pinned it to the edges of the mask and tried it on to make sure it wasn't too tight or loose around the ears.
When I was happy with the length, I stitched the elastic in place.
Alternatively, you can attach ribbons/cords/bias binding to the edges so that the mask has ties rather than looping elastic around your ears.
7.
Making Binding for the edges
 |
7 cm wide strip of fabric used to bind the edge of the mask.
Folded and ironed in half and then the edges folded and ironed in.
|
I cut 7 cm strips of fabric. These can either be cut on the bias or cut on the grain. I chose to just cut it out on the grain.
Fold and iron the 7 cm strip in half, then fold both edges into the centre and iron these in place so that the creases remain when it is unfolded.
8.
Attaching the binding
 |
| Position and stitch the binding at the edge of the mask. |
Cut two pieces of the binding (one for each end).
Lay the piece of binding fabric flat and pin it against the edge, with the first crease to the inside of the elastic. Stich in place.
 |
| Fold the extra fabric at the top and bottom over. |
Now, fold the binding over the edge, through the loop of the elastic.
Once through the elastic, turn the mask over, and folding the raw edge under pin the binding in place.
 |
| Tuck the edge of the binding under and stitch the binding to the back side of the mask |
This can be done using a sewing machine, but I am really bad at "stitch in the ditch" and it ends up looking a mess. I personally find hand sewing neater, even if it takes a little longer.
That is it - you now have a finished facemask!
 |
| Finished facemasks. |
Overall, I am pleased with the way that these masks have turned out as they are actually fairly comfortable to wear and they don't feel too claustrophobic.


Comments
Post a Comment